Linked Data Deployment DOAP Tutorial
The following tutorial demonstrates deployment of DOAP files as Linked Data.
Prerequisites
In order to be able to produce the steps below, you need to have at least the following packages installed:
- ODS —
ods_framework_dav.vad - Briefcase —
ods_briefcase.vad - Conductor —
conductor_dav.vad
Tutorial
- Go to ODS, i.e., http://host:port/ods and register user, for ex. john.
- Login as user john and go to ODS->Briefcase
- Create new instance with checked box "Visible to Public".
- Browse path
DAV/home/john. - As result there will be shown a new created by the system folder "Public". Place in this folder your DOAP files. For ex. place the attached to this article doap_iODBC.rdf, doap_OAT.rdf, doap_odbc-bench.rdf, doap_odbc-rails.rdf, doap_ODS.rdf, doap_VOS.rdf files.
- Upload to the
DAV/home/john/Publicfolder also.ttl,.ntand.rdffiles for ex. such as: open source_projects.nt, open_source_projects.ttl, open_source_projects.rdf - Now go to path
/DAV/home/john/rdf_sinkand click the "Upload" button. - In the shown form perform the following:
- Select for "Destination" the "RDF Store" check-box
- Enter for "RDF graph name" your graph name, for ex. http://myhost.com/doap.
- For "Source": "File" click the "Browse" button and upload either a DOAP file (if you do this, you need to perform the same upload steps for every DOAP file), or upload one rdf file, which contain information for all your DOAP files. In our tutorial such file is the open source_projects.rdf one.
- As result there will be created a graph with inserted triples the information retrieved from the uploaded rdf file(s).
- For reference how the rdf_sink folder works, please visit our article ODS RDF Sink Folder Implementation
- Also you can take a look to our article Virtuoso RDF Sink Folder Implementation
- Full information you can find at RDF Insert Methods in Virtuoso article.
- Let's check the data in the graph <http://myhost.com/doap>:
- Go to the Virtuoso sparql endpoint, i.e. to http://host:port/sparql.
- Enter for Default Graph URI your graph, for ex.http://myhost.com/doap
- Enter for Query:
SELECT * WHERE {?s ?p ?o} - Click the "Run Query" button.
- As result should be shown the saved triples, for ex.:
s                                            p                                                 o
http://myhost.com/DOAP/odbc-rails.rdf#this   http://www.w3.org/1999/02/22-rdf-syntax-ns#type   http://usefulinc.com/ns/doap#Project
http://myhost.com/DOAP/odbc-rails.rdf#this   http://www.w3.org/2000/01/rdf-schema#seeAlso      http://data.openlinksw.com/oplweb/product_family/uda#this
http://myhost.com/DOAP/odbc-rails.rdf#this   http://xmlns.com/foaf/0.1/maker                   http://myhost.com/dataspace/organization/john#this
http://myhost.com/DOAP/odbc-rails.rdf#this   http://usefulinc.com/ns/doap#created              2006-08-23
http://myhost.com/DOAP/odbc-rails.rdf#this   http://usefulinc.com/ns/doap#license              http://usefulinc.com/doap/licenses/mit
http://myhost.com/DOAP/odbc-rails.rdf#this   http://usefulinc.com/ns/doap#name                 ODBC Data Adapter for Ruby on Rails
http://myhost.com/DOAP/odbc-rails.rdf#this   http://usefulinc.com/ns/doap#homepage             http://rubyforge.org/projects/odbc-rails/
...
- You can also execute from ISQL DESCRIBE over the Project rdf:about values, in order to check that all the data in the graph is correct:
SQL> SPARQL DESCRIBE <http://myhost.com/DOAP/iodbc.rdf#this> FROM <http://myhost.com/doap>; callret-0 LONG VARCHAR _______________________________________________________________________________ <http://myhost.com/DOAP/iodbc.rdf#this> <http://www.w3.org/1999/02/22-rdf-syntax-ns#type> <http://usefulinc.com/ns/doap#Project> ; <http://www.w3.org/2000/01/rdf-schema#seeAlso> <http://data.openlinksw.com/oplweb/product_family/uda#this> ; <http://xmlns.com/foaf/0.1/maker> <http://myhost.com/dataspace/organization/john#this> ; <http://usefulinc.com/ns/doap#created> "1998-12-27" ; <http://usefulinc.com/ns/doap#license> <http://usefulinc.com/doap/licenses/lgpl> ; <http://usefulinc.com/ns/doap#name> "iODBC" ; <http://usefulinc.com/ns/doap#homepage> <http://www.iodbc.org/> ; <http://usefulinc.com/ns/doap#shortdesc> "iODBC is the acronym for Independent Open DataBase Connectivity, an Open-Source platform-independent implementation of both the ODBC and X/Open specifications." ; <http://usefulinc.com/ns/doap#description> "The ability to develop applications independent of back-end database engine, operating system, and for the most part programming language. Although ODBC and iODBC are both C-based Application Programming Interfaces (APIs) there are numerous cross language hooks and bridges from languages such as: C++, Java, Perl, PHP, Python, Ruby, TCL, and others." ; <http://usefulinc.com/ns/doap#mailing-list> <http://www.iodbc.org/index.php?page=maillists> ; <http://usefulinc.com/ns/doap#download-page> <http://www.iodbc.org/index.php?page=downloads/index> ; <http://usefulinc.com/ns/doap#programming-language> "C" ; <http://usefulinc.com/ns/doap#category> <http://projects.apache.org/category/database> ; <http://usefulinc.com/ns/doap#release> _:b1000057228 ; <http://usefulinc.com/ns/doap#maintainer> _:b1000057229 . - Now go to Virtuoso Conductor, i.e. http://host:port/conductor and login as dba.
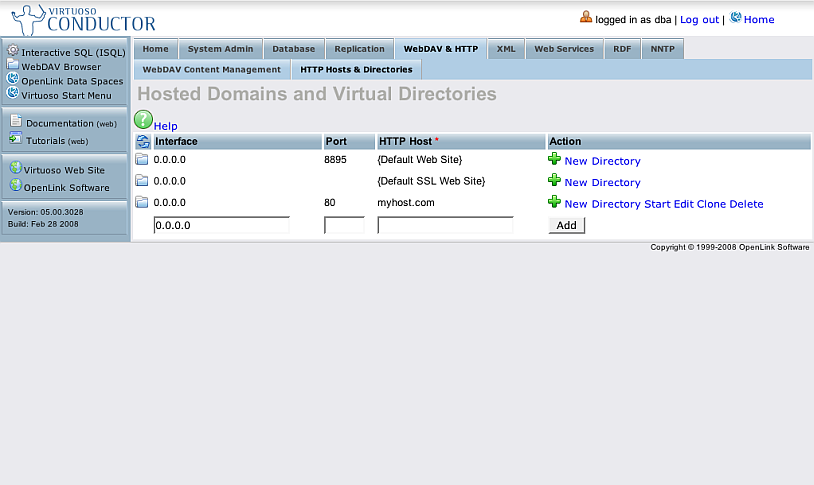
- Go to WebDAV&HTTP->HTTP Hosts&Directories
- Define a new Host in the form shown at the bottom, i.e.:
- Enter the Interface address in the first field where is shown the value 0.0.0.0
- Enter the port in the second field
- Enter the HTTP host name, for ex. myhost.com
- Click the button "Add".
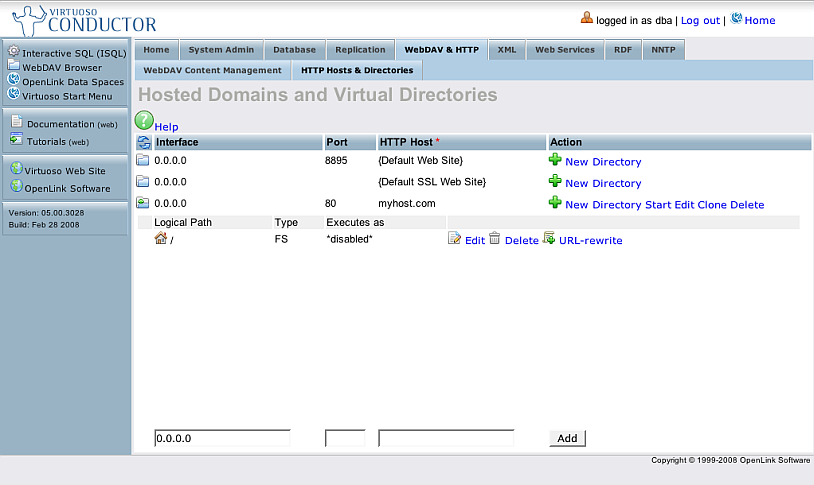
- Click the blue folder icon infront of the created host.
- As result will be shown for "Logical Path": /.
Click its "Edit" link
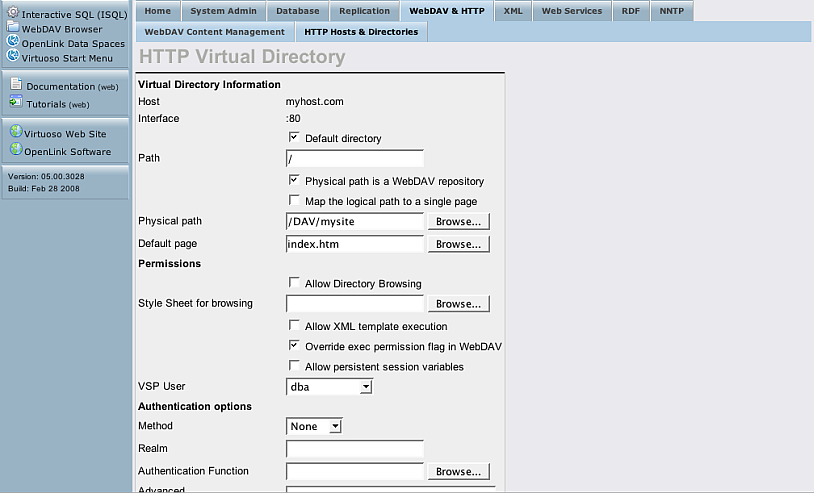
- In the shown form:
- Check the check-box "Default directory"
- Check the check-box "Physical path is a WebDAV repository".
- Enter for field "Physical path" an existing location of your default host, for ex.
/DAV/mysite/
- if there is no such folder mysite:
- Go WebDAV Content Management and create under dav folder with name "mysite".
- Go to folder "mysite"
- Upload a default index file which contain rel links to the DOAP files, for ex, the following index.htm file:
<html xmlns="http://www.w3.org/1999/xhtml">
<head>
<meta http-equiv="Content-Type" content="text/html; charset=ISO-8859-1" />
<title>My Site</title>

<link rel="meta" title="DOAP" href="projects/doap_OAT.rdf"
      type="application/rdf+xml" />
<link rel="meta" title="DOAP" href="projects/doap_ODS.rdf"
      type="application/rdf+xml" />
<link rel="meta" title="DOAP" href="projects/doap_VOS.rdf"
      type="application/rdf+xml" />
<link rel="meta" title="DOAP" href="projects/doap_iODBC.rdf"
      type="application/rdf+xml" />
<link rel="meta" title="DOAP" href="projects/doap_odbc-bench.rdf"
      type="application/rdf+xml" />
<link rel="meta" title="DOAP" href="projects/doap_odbc-rails.rdf"
      type="application/rdf+xml" />
<link rel="meta" title="DOAP" href="projects/open_source_projects.rdf"
      type="application/rdf+xml" />
<link rel="meta" title="DOAP" href="projects/open_source_projects.nt"
      type="text/rdf+n3" />
<link rel="meta" title="DOAP" href="projects/open_source_projects.ttl"
      type="text/rdf+ttl" />
</head>

<body>
Some text here...
</body>
</html>
- if there is no such folder mysite:
- Enter for "Default page": index.htm
- Check the check-box "Override exec permission flag in WebDAV"
- Change "VSP User" to: dba
- Click the button "Save changes".
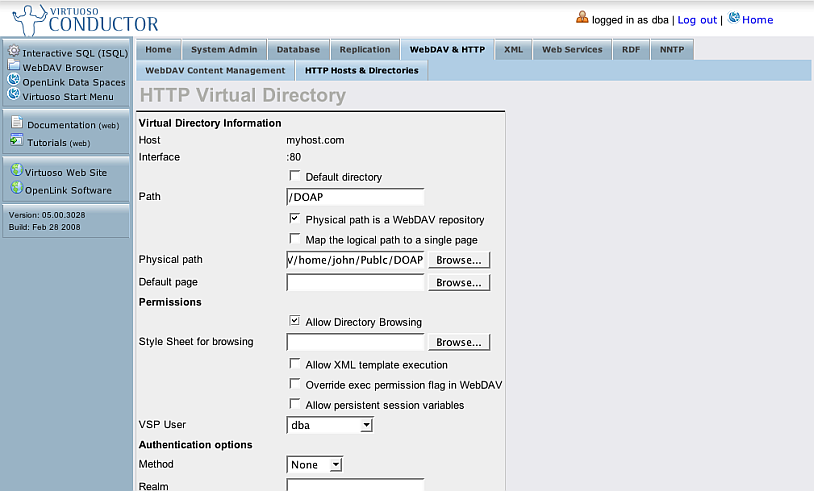
- Now let's create a new virtual directory:
- Click the "New Directory" link for the host with name "myhost.com".
- In the shown form select type "WebDAV domain" and click "Next".

- In the shown form:
- Enter for "Path": /DOAP
- Enter for "Physical path" the location of the DOAP files, i.e. /DAV/home/john/Public/DOAP/
- Check the check-box "Allow Directory Browsing".
- Click the "Save Changes" button.
- Let's add a URL rewrite rule to the created virtual directory:
- For the virtual directory "/DOAP" click the link "URL-rewrite".
- In the shown form:
- Change "Rule matching" to: Last matching
- Enter for "Request Path pattern":
/DOAP/([^#]*) - Enter for "Accept Header Request pattern":
(application/rdf.xml)|(text/rdf.n3)|(text/rdf.turtle)|(text/rdf.ttl) - Leave "Destination format Conversion function" and "HTTP Response Headers" empty.
- Change "HTTP Response Code" to: Internal Redirect.
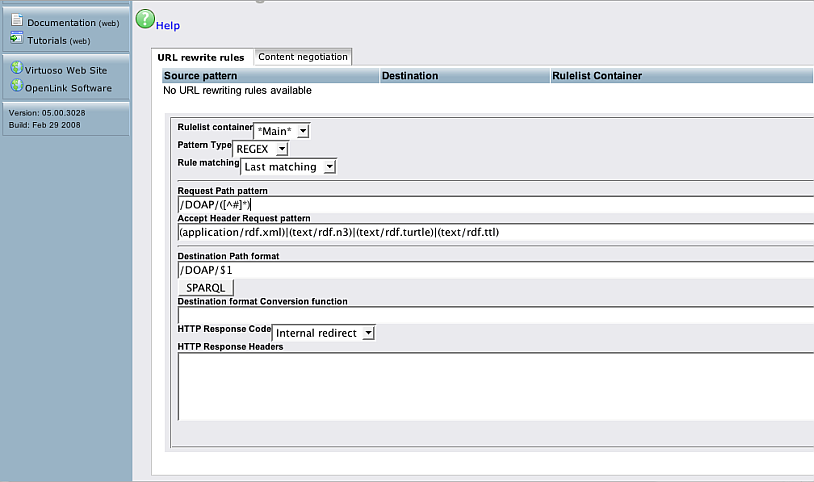
- For "Destination Path format" click the "SPARQL" button.
- Enter in the "SPARQL Query" text-area the following:
DESCRIBE <http://myhost.com/DOAP/$s1#this> FROM <http://myhost.com/doap>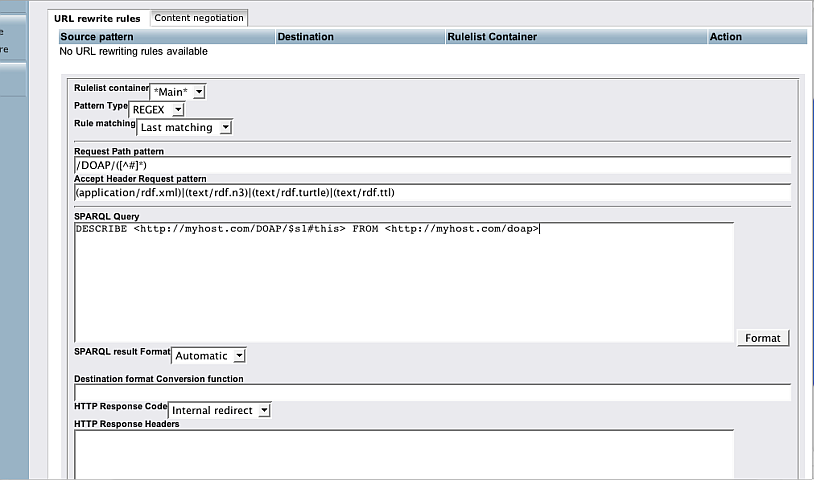
- Click the button "Format".
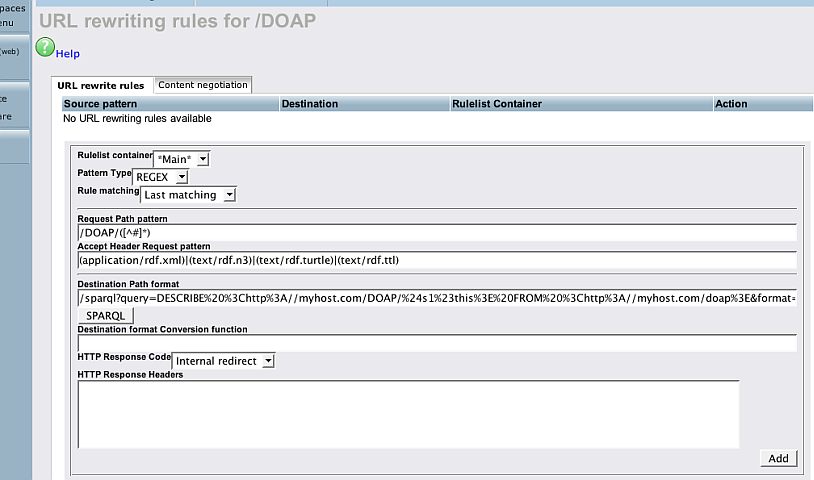
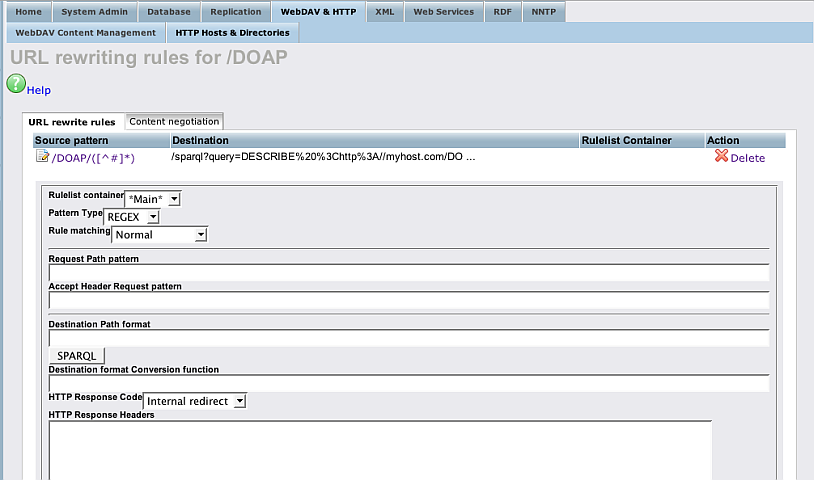
- Click the button "Add".
- Now let's check with the Virtuoso RDF Browser the data retrieved from the DOAP files:
- Go to http://demo.openlinksw.com/DAV/JS/rdfbrowser/index.html
- Checking the OAT DOAP file:
- Enter for Data Source URI: http://myhost.com/projects/doap_OAT.rdf
- Click the "Query" button".
- As result should be retrieved 23 triples. Click the "Project" OAT link in order to expand the rest of the triples.
- Checking the ODS DOAP file:
- Enter for Data Source URI: http://myhost.com/projects/doap_ODS.rdf
- Click the "Query" button".
- As result should be retrieved 31 triples. Click the "Project" "OpenLink Data Spaces (ODS - Open Source Edition)" link in order to expand the rest of the triples.
- Check the rest of the DOAP files from http://myhost.com/projects/
- You can also retrieve information for all the files querying the
open_source_projects.rdffor ex.