Simple .NET RIA Services Application using Virtuoso as the Data Server
- Introduction
- Prerequisites
- Creating the Application
- Step 1 - Create the Visual Studio Projects
- Step 2 - Add the Data Model
- Step 3 - Add a Domain Service
- Step 4 - Display The Data
- Displaying RDF Data
- Step 1 - Create the View in Virtuoso
- Step 2 - Modify the Solution To use the View
- Step 3 - Make Hyperlinks From IRIs
- Next Steps
Introduction
.NET RIA Services is a new framework from Microsoft that simplifies the development of N-Tier web applications. A typical application will consist of a presentation layer, application logic and a data access layer. In the examples that follow, we will be using a combination of Silverlight 3.0 and .NET RIA Services for the presentation and application layers, while using Virtuoso as the data server via its native ADO.NET provider. The first example demonstrates how to display data from the Employee table in the Demo database using web page hosted grid control. The second example shows the navigational power behind hyperlinked data (de-referenceable HTTP scheme IRIs) exposed by Linked Data Views built stop Virtuoso's demonstration relational database schema (which is very similar to SQL Server's Northwind Database).
Prerequisites
- The example assumes that you have a local Virtuoso server with the Northwind demo database installed. If the demo database is not already installed then download the demo database VAD package (demo_dav.vad) and install it. The VAD package will create a new database in Virtuoso called demo containing the familiar Northwind tables. It will also creates Linked Data Views of the Northwind tables. In the example we assume the database is accessible on a hostname of "demo.openlinksw.com" on the default port 80, where an actually live instance of the Virtuoso Demo database is hosted. Users would use the appropriate hostname and port number of their Virtuoso installation to create the sample application, and would be would be localhost:8890 for a default installation or whatever the URIQA DefaultHost Virtuoso configuration parameter is set to when the demo database VAD package is installed.
- The Virtuoso ADO.Net provider for .Net 3.5 and the Entity Framework
- Microsoft Visual Studio 2008
- The Virtuoso Cartridges VAD package
- Silverlight 3 Tools for Visual Studio 2008 SP1
- Microsoft .NET RIA Services July 2009 Preview
Creating the Application
Step 1 - Create the Visual Studio Projects
- Open Visual Studio and create a new Silverlight Application project. Call the project DemoApplication.
- In the New Silverlight Application dialog ensure that Enable .NET RIA Services is checked.
Click the OK button.
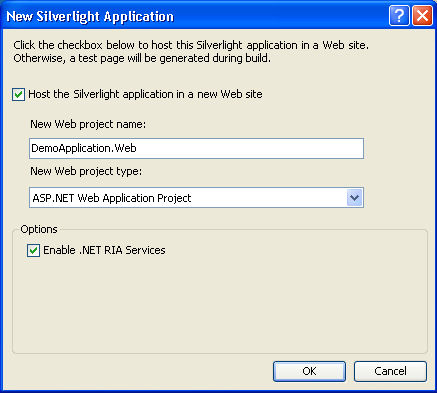
- At this point a skeleton solution is created that consists of a client project called DemoApplication and a server project called DemoApplication.Web. This application will use data from the Virtuoso database. We add the data and its schema to the application by adding an ADO.NET entity data model to the server project.
Step 2 - Add the Data Model
- Right click the server project in the Solution Explorer and Add New Item. In the dialog box select ADO.NET Entity Data Model and call it demo.edmx. Click the Add button. This will open the Entity Data Model Wizard.
- Choose Generate From Database and click Next.
- Set up a connection to the Demo database on your local Virtuoso Server, select Yes, include the sensitive data in the connection string and set the name of the entities to DemoEntities. Click Next.
- On the Choose Your Database Objects page expand Tables and select Employees.
Check that the Model Namespace is DemoModel and click Finish.
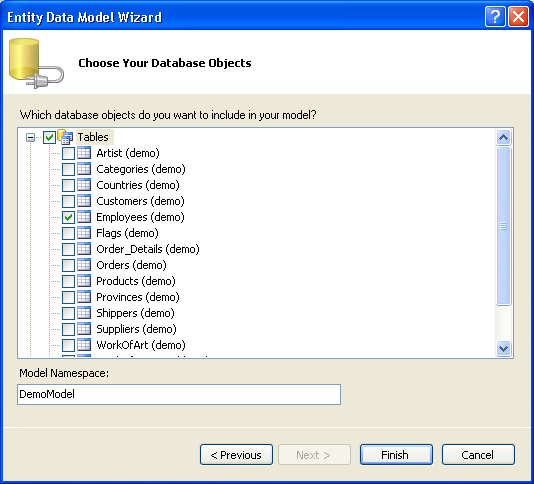
- We want to make the entities in the model available to both the client and server parts of the solution. To do this we need to add a DomainService to the solution. However, to make the entities from the data model available to the domain service we must first build the solution.
Step 3 - Add a Domain Service
- First build the solution.
- Right click the server project in the Solution Explorer and Add New Item. In the dialog box choose Domain Service Class from the Templates pane and call it EmployeeService.cs. Click Add. This will open the Add New Domain Service Class dialog.
- The entities from the model we have just added to the project are listed under Entities.
Tick the box next to Employees.
and click OK.
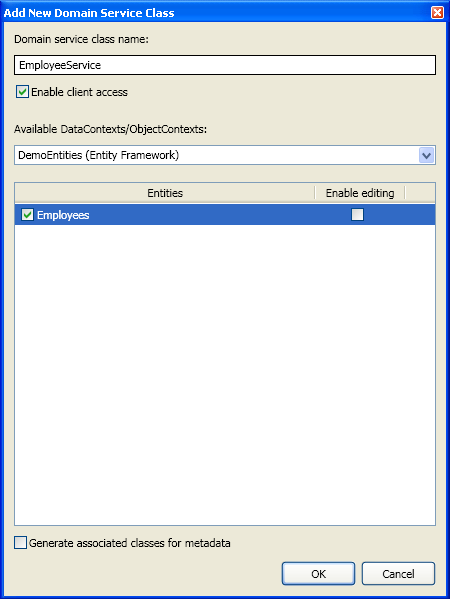
- This will create the DomainService class and generated code in both the client and server parts of the application. The Silverlight client can now interact with the data through the DomainContext class in the client project. At this point you need to build the solution again.
Step 4 - Display The Data
- From the Silverlight XAML Controls in the Toolbox drag a DataGrid between the <Grid> </Grid> tags on MainPage.xaml in the client.
Call the grid EmployeeGrid.
<data:DataGrid Name="EmployeeGrid"></data:DataGrid>
- Instantiate the DomainContext to get the list of employees and add them to the grid by adding code to MainPage.xaml.cs so it looks like this:
using System;
using System.Collections.Generic;
using System.Linq;
using System.Net;
using System.Windows;
using System.Windows.Controls;
using System.Windows.Documents;
using System.Windows.Input;
using System.Windows.Media;
using System.Windows.Media.Animation;
using System.Windows.Shapes;
using DemoApplication.Web;
using System.Windows.Ria.Data;

namespace DemoApplication
{
    public partial class MainPage : UserControl
    {
        private EmployeeContext _employeeContext = new EmployeeContext();
        public MainPage()
        {
            InitializeComponent();
            LoadOperation<Employees> LoadOp =
                this._employeeContext.Load(this._employeeContext.GetEmployeesQuery());
            this.EmployeeGrid.ItemsSource = LoadOp.Entities;
        }
    }
}
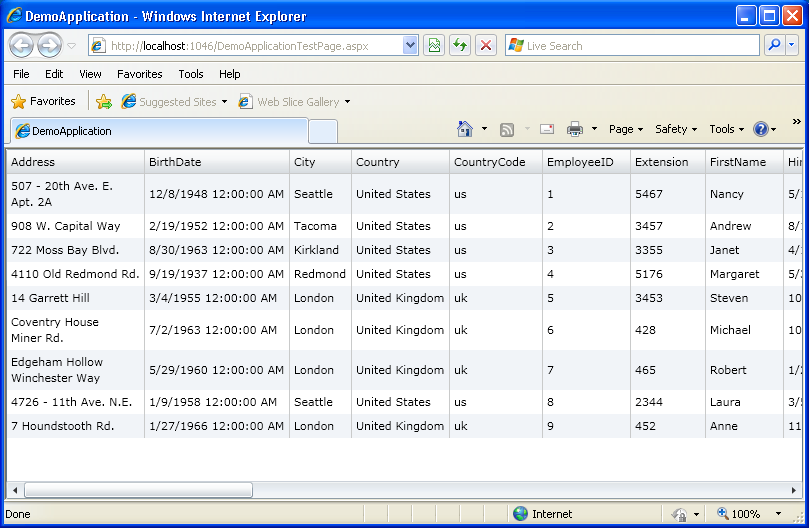
- Build and run the application.
Internet Explorer will be launched and you will see the data displayed on the page as a grid.
Displaying RDF Data
One advantage of using Virtuoso as the data server is the seamless way in which we can use this use this application to expose dereferenceable HTTP IRIs which make the record level relationships explorable across many dimensions.
Virtuoso's hybrid SPASQL (SPARQL inside SQL) query language enables RDF model data -- hosted within the Virtuoso Quad store -- to be queried using SPARQL from any of its SQL interfaces (ODBC, JDBC, ADO.NET, OLE-DB, XMLA); all you do is prefix your queries with the keyword SPARQL. In the example that follows we will use SPASQL to create a SQL view that exposes IRIs for records in the Employee table.
Step 1 - Create the View in Virtuoso
- Open the Virtuoso Conductor.
- In iSQL, execute the following statement.
Remember to use the appropriate hostname and port number of your Virtuoso installation, typically localhost:8890 for a default installation or whatever the URIQA DefaultHost Virtuoso configuration parameter was set to when the demo database VAD package was installed.
CREATE VIEW Demo.demo.sparqlview as
SPARQL
PREFIX nwind: <http://demo.openlinksw.com/schemas/northwind#>
SELECT DISTINCT  ?s
FROM <http://demo.openlinksw.com/Northwind>
WHERE {?s a nwind:Employee}
Step 2 - Modify the Solution To use the View
- Delete the existing Employee model and add a new one that comprises this new view.
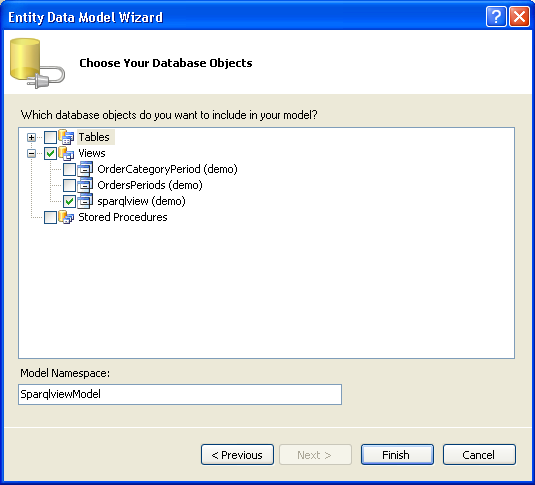
- Delete the DomainService.
Build the solution and add a new DomainService called EmployeeService.
Select the sparqlview entity.
Build the solution.
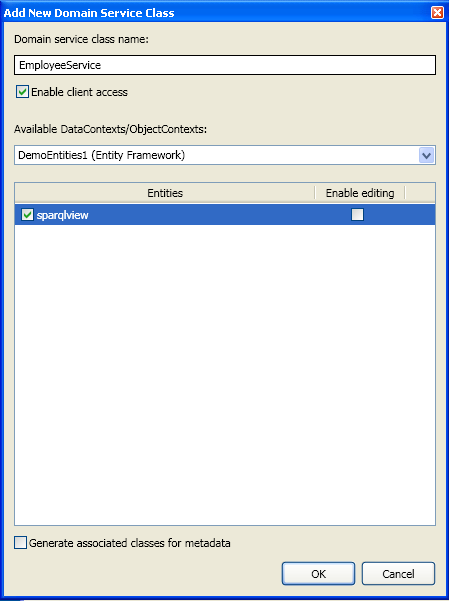
- Modify the code in mainpage.xaml.cs so it uses the sparqview entity.
It should look like this:
using System;
using System.Collections.Generic;
using System.Linq;
using System.Net;
using System.Windows;
using System.Windows.Controls;
using System.Windows.Documents;
using System.Windows.Input;
using System.Windows.Media;
using System.Windows.Media.Animation;
using System.Windows.Shapes;
using DemoApplication.Web;
using System.Windows.Ria.Data;

namespace DemoApplication
{
    public partial class MainPage : UserControl
    {
        private EmployeeContext _employeeContext = new EmployeeContext();
        public MainPage()
        {
            InitializeComponent();
            LoadOperation<sparqlview> LoadOp =
                this._employeeContext.Load(this._employeeContext.GetSparqlviewQuery());
            this.EmployeeGrid.ItemsSource = LoadOp.Entities;
        }
    }
}
- Build and run the application.
You will see a list of IRIs that identify the Northwind employees.
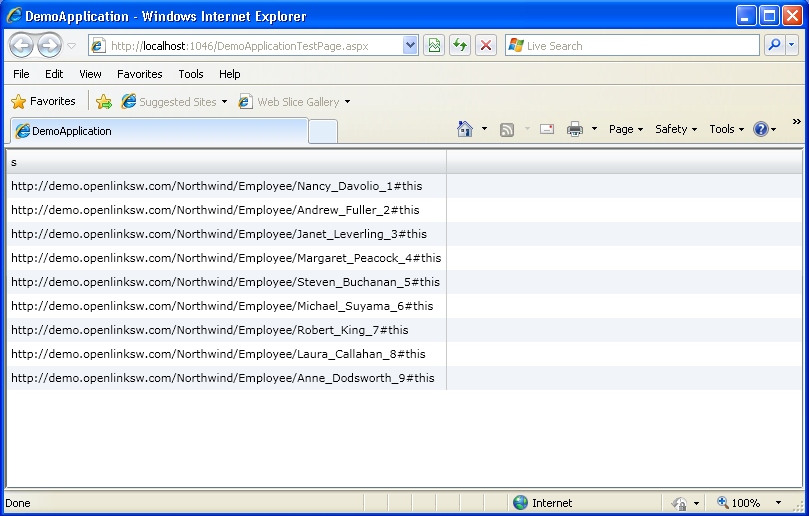
- To realize the power of linked data we would now liked to begin exploring this data by clicking on these IRIs.
Step 3 - Make Hyperlinks From IRIs
- Modify the DataGrid in MainPage.xaml to bind the IRI in each cell of the grid to a Hyperlink button.
- We set the AutoGenerateColumns property of the DataGrid to False then add our own Template for the column.
MainPage.xaml should look like this:
<UserControl xmlns:data="clr-namespace:System.Windows.Controls;assembly=System.Windows.Controls.Data"  x:Class="DemoApplication.MainPage"
    xmlns="http://schemas.microsoft.com/winfx/2006/xaml/presentation"
    xmlns:x="http://schemas.microsoft.com/winfx/2006/xaml"
    xmlns:d="http://schemas.microsoft.com/expression/blend/2008" xmlns:mc="http://schemas.openxmlformats.org/markup-compatibility/2006"
    mc:Ignorable="d" d:DesignWidth="640" d:DesignHeight="480">
  <Grid x:Name="LayoutRoot">
      <data:DataGrid Name="EmployeeGrid" AutoGenerateColumns="False">
            <data:DataGrid.Columns>
                <data:DataGridTemplateColumn Header="Employee">
                    <data:DataGridTemplateColumn.CellTemplate>
                        <DataTemplate>
                            <StackPanel x:Name="DisplayEmployeeData"
                                        Orientation="Horizontal"
                                        VerticalAlignment="Bottom"
                                        Margin="5" >
                                <HyperlinkButton Content ="{Binding s}"
                                                 NavigateUri="{Binding s}"
                                                 Margin="5,0,0,0"
                                                 VerticalAlignment="Bottom"
                                                 HorizontalAlignment="Left"
                                                 FontSize="12">
                                </HyperlinkButton>
                            </StackPanel>
                        </DataTemplate>
                    </data:DataGridTemplateColumn.CellTemplate>
                </data:DataGridTemplateColumn>
            </data:DataGrid.Columns>
        </data:DataGrid>
    </Grid>
</UserControl>
- If we build and run the project now each IRI in the list appears as a hyperlink.
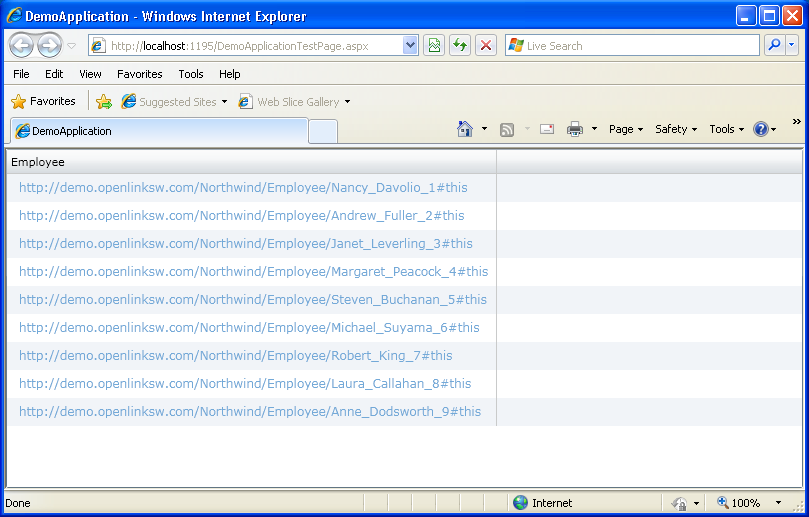
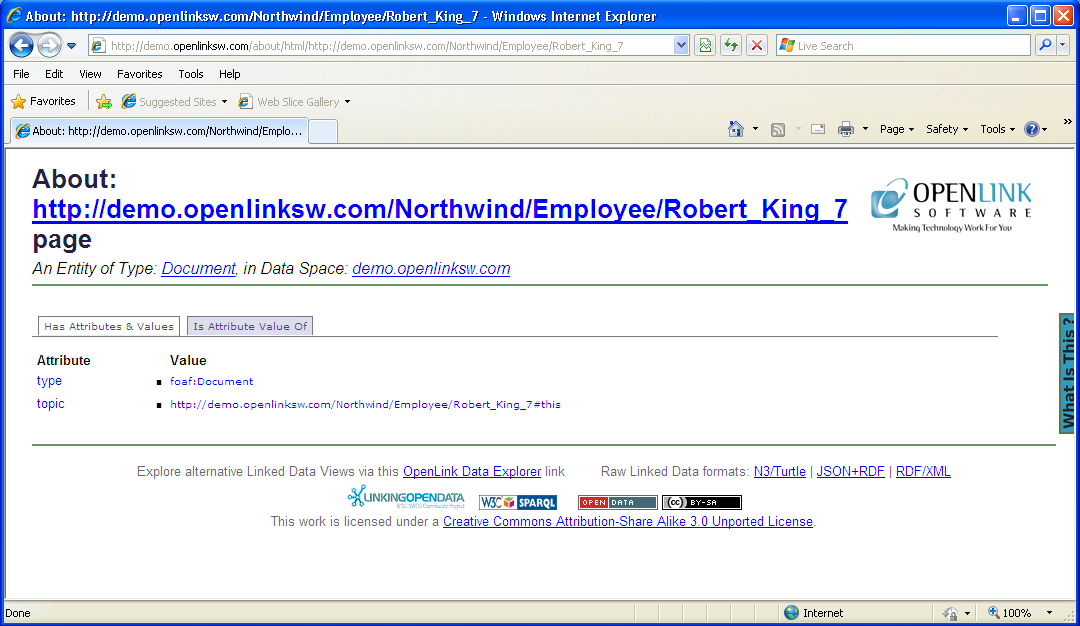
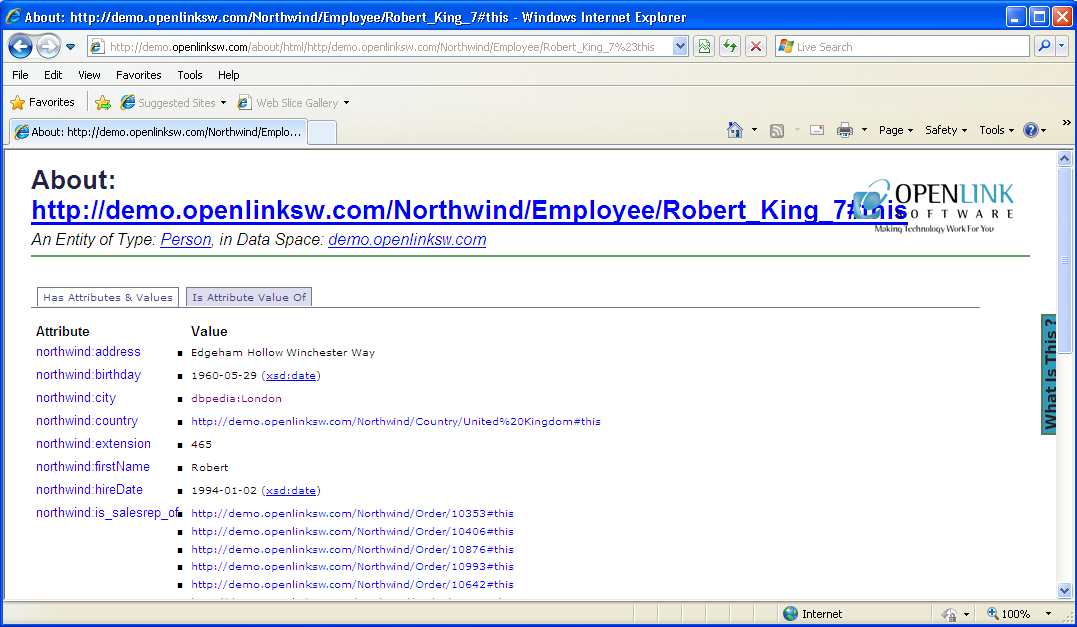
- Clicking on each of the links exposes new Employee relations where each Attribute and Value (optionally) pair also exist in link form.
Each of these links creates a powerful linked data graph exposing data level relationships, all devoid of traditional join overhead associated with relational queries.
Next Steps
The examples in this document show you how to simply display data in a browser using Silverlight 3 and .NET RIA Services. See an example of a more complicated application.