
Silverlight Application for Browsing RDF Data
Introduction
There are several examples in this documentation showing how to integrate Virtuoso's RDF data store into a Windows forms application or ADO.NET Data Service using the Virtuoso ADO.NET Data Provider. This example demonstrates how it is is possible to bypass ADO.NET completely and integrate RDF data from Virtuoso into a Silverlight application by directly querying the SPARQL endpoint on the Virtuoso Server using the .NET WebClient.
Prerequisites
- Virtuoso Server.
- The Virtuoso Cartridges VAD package.
- Microsoft Visual Studio 2008.
- Silverlight 3 Tools for Visual Studio 2008 SP1.
Create the Silverlight Application
Create the project
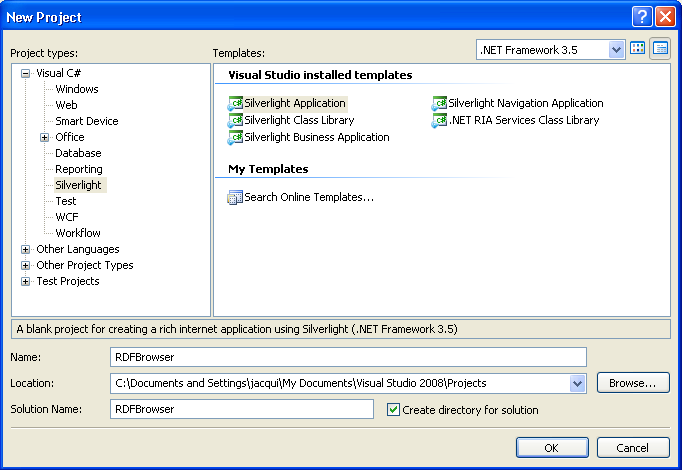
- Open Visual Studio and create a new Silverlight Application project called RDFBrowser.
Click the OK button.
- In the New Silverlight Application dialog box check the Host the Silverlight application in a new Web site box. Click OK.
- Add a title to the Silverlight page by editing
MainPage.xaml. Drag a TextBlock from the Toolbox ontoMainPage.xamlbetween the<Grid>and</Grid>tags. Add the title text, "Example RDF Browser" and some formatting so that it looks like:
<TextBlock Text="Example RDF Browser" FontSize="20" ></TextBlock>
Get The List of Graphs
Below the title we want a box where we can type in the address of a SPARQL endpoint and a button to click to get a list of graphs available on that endpoint. So drag another TextBlock, a TextBox and a Button onto the grid. We will now add some row and column formatting to the grid as well.
      <Grid x:Name="LayoutRoot">
        <Grid.RowDefinitions>
            <RowDefinition Height="80"/>
            <RowDefinition Height="40"/>
            <RowDefinition Height="40"/>
        </Grid.RowDefinitions>
        <Grid.ColumnDefinitions>
            <ColumnDefinition Width="60" />
            <ColumnDefinition Width="60" />
            <ColumnDefinition Width="350"/>
            <ColumnDefinition Width="100"/>
            <ColumnDefinition Width="100"/>
        </Grid.ColumnDefinitions>
        <TextBlock Text="Example RDF Browser"  FontSize="20" Grid.Row="0" Grid.Column="0" Grid.ColumnSpan="4" HorizontalAlignment="Center" VerticalAlignment="Center"/>
        <TextBlock Text="Endpoint:" HorizontalAlignment="Right" VerticalAlignment="Center" Grid.Row="1" Grid.Column="1"></TextBlock>
        <TextBox Text="{Binding Mode=OneWay}" x:Name="txtEndpoint" HorizontalAlignment="Left" VerticalAlignment="Center" Width="290" Height="30" Grid.Row="1" Grid.Column="2"></TextBox>
        <Button Content="Get Graphs" Click="Button_Click" VerticalAlignment="Center" Grid.Row="1" Grid.Column="3"/>
    </Grid>
Note the binding of the TextBox to a variable called txtEndpoint. This makes text typed into the TextBox available to the code. Also note that the button click handler method, Button_Click. When the Get Graphs button is clicked we want to send a query to the endpoint and get back a list of graphs.
We will need to create the Button_Click method in the code behind file, MainPage.xaml.cs.
- Open
MainPage.xaml.csand paste the following method beneath the MainPage method. System.IO and System.Text will need to be added to the using block.
       private void Button_Click (object sender, RoutedEventArgs e)
        {
            StringBuilder sb = new StringBuilder();

            sb.Append("http://" + txtEndpoint.Text + "/sparql?&query=select+distinct+%3Fg+where+{graph+%3fg+{%3Fs+%3Chttp%3A//www.w3.org/1999/02/22-rdf-syntax-ns%23type%3E+%3Fo}}&format=text%2Fxml");

            try
            {
                WebClient client = new WebClient();
                client.DownloadStringCompleted += new DownloadStringCompletedEventHandler(client_DownloadStringCompleted);
                client.DownloadStringAsync (new Uri(sb.ToString()));
            }
            catch (WebException webEx)
            {
                Console.WriteLine(webEx.ToString());
                if (webEx.Status == WebExceptionStatus.ConnectFailure)
                {
                    Console.WriteLine("Are you behind a firewall?  If so, go through the proxy server.");
                }
            }
        }
- In the Button_Click method a WebClient object is created to send the SPARQL protocol web request.
The SPARQL request that is sent is equivalent to
SELECT DISTINCT ?g
WHERE { GRAPH ?g { ?s <http://www.w3.org/1999/02/22-rdf-syntax-ns/type> ?o } }
- This web request returns an XML result set.
The line:
client.DownloadStringCompleted += new DownloadStringCompletedEventHandler(client_DownloadStringCompleted);
adds an event handler to the WebClient to process these results. We need to add the event handler method client_DownloadStringComplete so paste the following code after the Button_Click method.
        void client_DownloadStringCompleted(object sender, DownloadStringCompletedEventArgs e)
        {
            if (e.Error == null)
            {
                List<String> graphs = new List<string>();

                using (XmlReader reader = XmlReader.Create(new StringReader(e.Result)))
                {
                    reader.Read();
                    while (reader.ReadToFollowing("literal"))
                    {
                        graphs.Add(reader.ReadElementContentAsString());
                    }
                }
        }
- This method extracts the list of available graphs from the returned XML and puts them in a List.
If you build and run the application it look like this:

- We now need to display the list of graphs in a drop down box so one can be selected.
We will also add another button to the app.
Open
MainPage.xamland define another row in the grid:
       <Grid.RowDefinitions>
            <RowDefinition Height="80"/>
            <RowDefinition Height="40"/>
            <RowDefinition Height="40"/>
- Add a TextBlock, a ComboBox and a Button
            <TextBlock x:Name="graphLabel" Text="Graphs:" Visibility="Collapsed"  HorizontalAlignment="Right" VerticalAlignment="Center" Grid.Column="1" Grid.Row="2" />
            <ComboBox x:Name="graphList" Visibility="Collapsed"  SelectedItem="{Binding Mode=OneWay}" HorizontalAlignment="Left" VerticalAlignment="Center" Width="290" Grid.Row="2" Grid.Column="2"></ComboBox>
            <Button x:Name="getTypeButton" Content="Get Types" Visibility="Collapsed"  Click="Button_Click2" VerticalAlignment="Center" Grid.Row="2" Grid.Column="3"/>
- We now want to fill the ComboBox with the list of graphs in client_DownloadStringComplete.
Open
MainPage.xaml.csand update the method so it looks like this.
        void client_DownloadStringCompleted(object sender, DownloadStringCompletedEventArgs e)
        {
            if (e.Error == null)
            {
                List<String> graphs = new List<string>();

                using (XmlReader reader = XmlReader.Create(new StringReader(e.Result)))
                {
                    reader.Read();
                    while (reader.ReadToFollowing("literal"))
                    {
                        graphs.Add(reader.ReadElementContentAsString());
                    }
                }
                graphList.ItemsSource = graphs;
                graphLabel.Visibility = Visibility.Visible;
                graphList.Visibility = Visibility.Visible;
                getTypeButton.Visibility = Visibility.Visible;
            }
            else
            {
                graphList.ItemsSource = null;
            }
        }
- The second button has a methods Button_Click2 to handle the click event.
We will add an empty method for now.
        private void Button_Click2(object sender, RoutedEventArgs e)
        {

        }
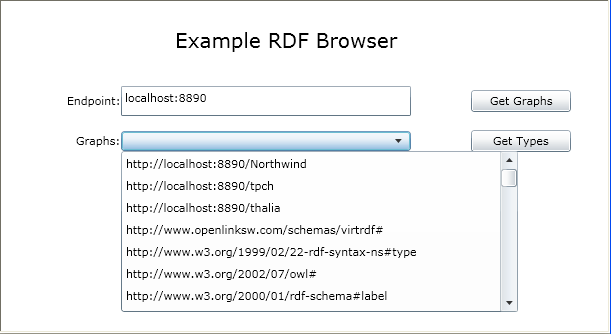
- Now check that the graphs are being fetched by building and running the application.
Type the hostname and port of a Virtuoso instance in the endpoint box and click the button.
There will be a pause while the SPARQL query is sent to Virtuoso and the list of graphs returned.
When the graph list is filled the ComboBox will become visible and you can select a graph.
Fetching The List of Types
The Get Types button does nothing so far. We need to add a body to the Button_Click2 method to issue another SPARQL query using the selected graph. This query will fetch a list of the types of object held in the graph. The query we want to send is
SELECT DISTINCT ?o
FROM <i>graph name</i>
WHERE {?s <http://www.w3.org/1999/02/22-rdf-syntax-ns/type> ?o}
where the from clause is the graph selected form the ComboBox.
1. Update the Button_Click2 method with the following code:
        private void Button_Click2 (object sender, RoutedEventArgs e)
        {
            StringBuilder sb = new StringBuilder();

            sb.Append("http://" + txtEndpoint.Text + "/sparql?default-graph-uri="+graphList.SelectedItem+"&query=select+distinct+%3Fo%0D%0Awhere+%0D%0A{%3Fs+%3Chttp%3A%2F%2Fwww.w3.org%2F1999%2F02%2F22-rdf-syntax-ns%23type%3E+%3Fo}&format=text%2Fxml");
            try
            {
                WebClient client2 = new WebClient();
                client2.DownloadStringCompleted += new DownloadStringCompletedEventHandler(client2_DownloadStringCompleted);
                client2.DownloadStringAsync(new Uri(sb.ToString()));
            }
            catch (WebException webEx)
            {
                Console.WriteLine(webEx.ToString());
                if (webEx.Status == WebExceptionStatus.ConnectFailure)
                {
                    Console.WriteLine("Are you behind a firewall?  If so, go through the proxy server.");
                }
            }
        }
- Again we are using a WebClient to send the query and we have defined a method, client2_DownloadStringCompleted to get the results. Add the client2_DownloadStringCompleted method:
        void client2_DownloadStringCompleted(object sender, DownloadStringCompletedEventArgs e)
        {
            if (e.Error == null)
            {
                List<String> types = new List<string>();

                using (XmlReader reader = XmlReader.Create(new StringReader(e.Result)))
                {
                    reader.Read();
                    while (reader.ReadToFollowing("literal"))
                    {
                        types.Add(reader.ReadElementContentAsString());
                    }
                }
                typeList.ItemsSource = types;
                typeLabel.Visibility = Visibility.Visible;
                typeList.Visibility = Visibility.Visible;
                getItemButton.Visibility = Visibility.Visible;
            }
            else
            {
                typeList.ItemsSource = null;
            }
        }
- This method takes the returned list of types and fills another ComboBox. We need to add another row to the grid in
MainPage.xamland a TextBlock, a ComboBox and a Button.
       <Grid.RowDefinitions>
            <RowDefinition Height="80"/>
            <RowDefinition Height="40"/>
            <RowDefinition Height="40"/>
            <RowDefinition Height="40"/>
and
        <TextBlock x:Name="typeLabel" Text="Types:" Visibility="Collapsed" HorizontalAlignment="Right" VerticalAlignment="Center" Grid.Column="1" Grid.Row="3" />
        <ComboBox x:Name="typeList" Visibility="Collapsed" SelectedItem="{Binding Mode=OneWay}" HorizontalAlignment="Left" VerticalAlignment="Center" Width="290" Grid.Row="3" Grid.Column="2"></ComboBox>
        <Button x:Name="getItemButton" Content="Get Items" Visibility="Collapsed" Click="Button_Click3" VerticalAlignment="Center" Grid.Row="3" Grid.Column="3"/>
- Again, we will add an empty method as the button click handler for now.
        private void Button_Click3(object sender, RoutedEventArgs e)
        {

        }
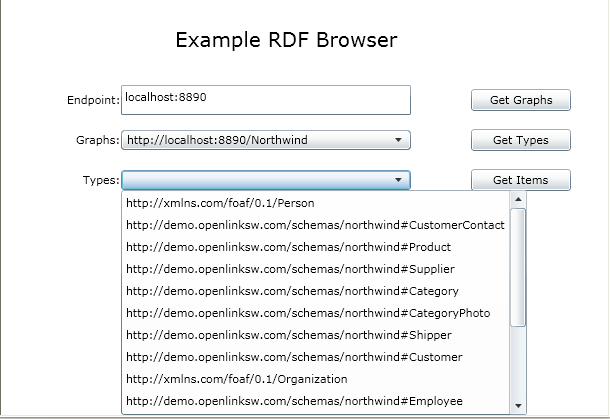
- Build and run the application.
You will see that the types of entity held in the graph are now listed in the second ComboBox. We want to be able to select one of the types and fetch a list of all the entities of that type in the graph.
Fetching the list of Entities.
When the Get Items button is clicked we want to query the endpoint for a list of all the entities in the selected graph whose type matches the type selected on the Types ComboBox. The SPARQL query we want to issue is
select ?s
from <i>Graph URI</i>
where {?s <> <i>Type URI</i>}
- Replace the empty Button_Click3 method with the following:
        private void Button_Click3(object sender, RoutedEventArgs e)
        {
            StringBuilder sb = new StringBuilder();

            sb.Append("http://" + txtEndpoint.Text + "/sparql?default-graph-uri=" + graphList.SelectedItem + "&query=select+distinct+%3Fs%0D%0Awhere+%0D%0A{%3Fs+%3Chttp%3A%2F%2Fwww.w3.org%2F1999%2F02%2F22-rdf-syntax-ns%23type%3E+%3C" + typeList.SelectedItem + "%3E}&format=text%2Fxml");
            //The selected type URI may contain a # - we need %23 instead
            String queryString;
            if (sb.ToString().IndexOf('#') > 0)
                queryString = sb.ToString().Replace("#", "%23");
            else
                queryString = sb.ToString();
            try
            {
                WebClient client3 = new WebClient();
                client3.DownloadStringCompleted += new DownloadStringCompletedEventHandler(client3_DownloadStringCompleted);
                client3.DownloadStringAsync(new Uri(queryString));
            }
            catch (WebException webEx)
            {
                Console.WriteLine(webEx.ToString());
                if (webEx.Status == WebExceptionStatus.ConnectFailure)
                {
                    Console.WriteLine("Are you behind a firewall?  If so, go through the proxy server.");
                }
            }
        }
- Again, we use a WebClient to send the query so need to add the method to handle the returned results.
Add the following method:
        void client3_DownloadStringCompleted(object sender, DownloadStringCompletedEventArgs e)
        {
            if (e.Error == null)
            {
                List<String> items = new List<string>();

                using (XmlReader reader = XmlReader.Create(new StringReader(e.Result)))
                {
                    reader.Read();
                    while (reader.ReadToFollowing("literal"))
                    {
                        items.Add(reader.ReadElementContentAsString());
                    }
                }
                uriGrid.ItemsSource = items;
                uriGrid.Visibility = Visibility.Visible;
            }
            else
            {
                uriGrid.ItemsSource = null;
            }
        }
- Again the results are loaded into a List.
However, this time we will display them in a DataGrid rather than a ComboBox.
Open
MainPage.xamland add another row to the grid
        <Grid.RowDefinitions>
            <RowDefinition Height="80"/>
            <RowDefinition Height="40"/>
            <RowDefinition Height="40"/>
            <RowDefinition Height="40"/>
            <RowDefinition Height="220"/>
- Drag a DataGrid from the Toolbox onto
MainPage.xamlafter the last button. Then replace<data:DataGrid>tags with the following:
</data:DataGrid>
            <data:DataGrid x:Name="uriGrid" Visibility="Collapsed" AutoGenerateColumns="False" Grid.Row="4" Grid.Column="1" Grid.ColumnSpan="3" >
                <data:DataGrid.Columns>
                    <data:DataGridTemplateColumn Header="Items">
                        <data:DataGridTemplateColumn.CellTemplate>
                            <DataTemplate>
                                <TextBlock Text="{Binding Mode=OneWay}"></TextBlock>
                            </DataTemplate>
                        </data:DataGridTemplateColumn.CellTemplate>
                        </data:DataGridTemplateColumn>
                </data:DataGrid.Columns>
            </data:DataGrid>
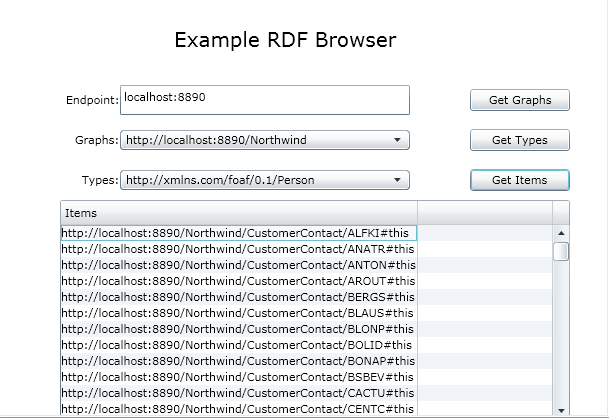
- This takes the URIs from the items List in client3_DownloadStringCompleted and displays them in the DataGrid. Build and run the project and you should see a list of entities of the selected type held in the selected graph.
Examining the Entities
- The list of entities in the DataGrid are identified by URI.
These URIs can be made into hyperlinks to take you to a description of the entity.
Simply remove the line
<TextBlock Text="{Binding Mode=OneWay}"></TextBlock>
fromMainPage.xamland replace it with:
<HyperlinkButton Content="{Binding}" NavigateUri="{Binding}" TargetName="_blank"></HyperlinkButton>
- One further change makes the results more readable by adding a scroll bar.
Surround the whole
    <ScrollViewer x:Name="LayoutRoot" Background="AliceBlue">
       <Grid>
      .
      .
      .
      </Grid>
   </ScrollViewer>
- Build and run the project and it should look like this.
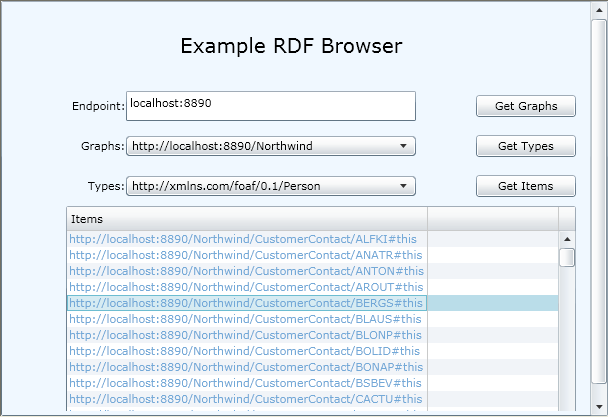
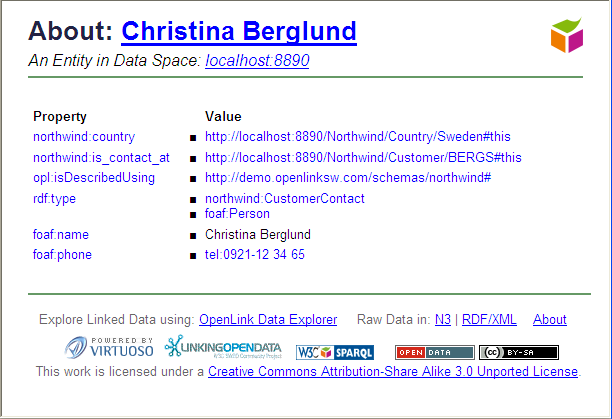
- If you click on one the the URIs identifying an entity it will take you to a page describing it.
Hosting the Silverlight Application
Testing the application so far has been done using the Visual Studio Development Server. It is possible to host the application using Virtuoso as the web server on non Windows platforms.
- The first stage is to get a copy of the files needed to run the application.
- In the Solution Explorer right click on RDFBrowser.Web and select Publish.
- In the Publish Web dialog box set a folder as the Target Location and select Only Files Needed To Run This Application.
- Click the Publish button.

- Copy the folder containing the exported files to the
vspfolder of the Virtuoso instance you want to use as the web server; typically,/usr/local/virtuoso-opensource/var/lib/virtuoso/vsp. - Open the Conductor and select the Web Application Server tab.
- Then select the Virtuoso Domains and Directories sub-tab.
- Select the Default Web Site Interface and Add New Directory.
- Select None as the template directory and click Next.
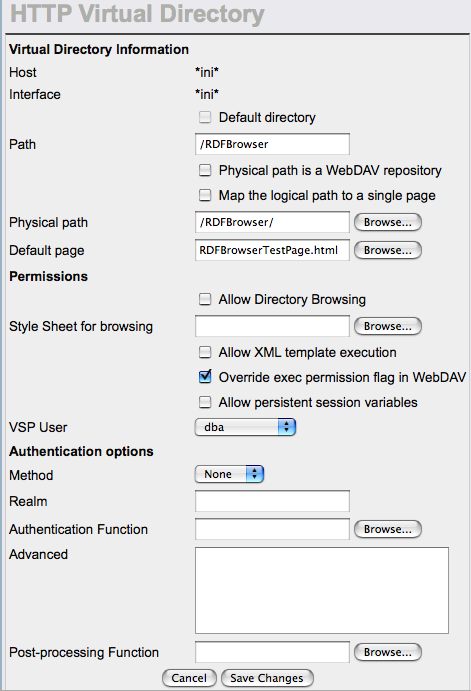
- In the Virtuoso Directory setup page set the Path to /RDFBrowser, the Physical path to the directory name below
/usr/local/virtuoso-opensource/var/lib/virtuoso/vsp; so in my example,RDFBrowserand the Default Page toRDFBrowserTestPage.html. - Check the Allow Directory Browsing box and Override exec permission flag in WebDAV.
- Set the VSP user to dba.
- Click the Save Changes button.
Virtuoso will now serve the Silverlight application.
In this example, it will be found at
http://localhost:8890/RDFBrowser.
Accessing Remote SPARQL End Points
This Silverlight application will only allow you to browse data on SPARQL endpoints that are accessible on your domain.
This is due to the Silverlight security model which is described in the MSDN.
As the Silverlight application is itself making HTTP web requests, these are restricted to only going to the domain that originally served the application.
To allow cross-domain access to the SPARQL service from Silverlight, the SPARQL endpoint would require either a clientaccesspolicy.xml or crossdomain.xml file allowing access from the site serving the Silverlight application.